I believe that the current limitation of Novice and Technician
licensees to, essentially, VHF and above for non-CW modes is
stifling and discourages many new hams from “trying out”
HF. While I personally have an appreciation for CW as a mode,
particularly for its simplicity and approachability for homebrew
construction, I think many new hams find it old-fashioned and
somewhat uninteresting. Now that the FCC
no longer requires CW competence for licensing (and it's arguable
whether or not they ever did, at the Novice/Tech level), many such
new hams may also have no experience in the mode. This means that
their only effective(ly interesting) HF privileges are 10 meter
phone and limited data — which can be a very frustrating
band, particularly as the solar cycle declines! (It can also be a
very rewarding band, but that takes a bit more experience.)
The addition of limited data privileges on one or more
lower-frequency bands would open new hams up to an HF experience
that can really show them the magic of the short waves. Many
younger hams are very comfortable with computers and digital
communications, and may even find this less intimidating than keying
down the mic and opening up a phone QSO! The enormous effective
reach at limited power levels would also give new hams with little
equipment the ability to make world-wide contacts on a budget. It
is my hope that such capabilities would lead hams that might
otherwise never work their way off the local VHF repeaters before
losing interest and buying a new smartphone into the wilds of HF,
where they can get an experience that is unlike those offered by the
Internet or mobile phone technologies.
I haven't seen the proposal mentioned in the article yet, but the
executive committee recommended that the ARRL solicit comments from
the membership on the issue. I look forward to reviewing the
proposal if they should do so, and I am confident that some
variation thereof would meet my approval. Nothing can help swell
the ranks of active Amateur Radio operators like including new hams
in exciting radio activities.
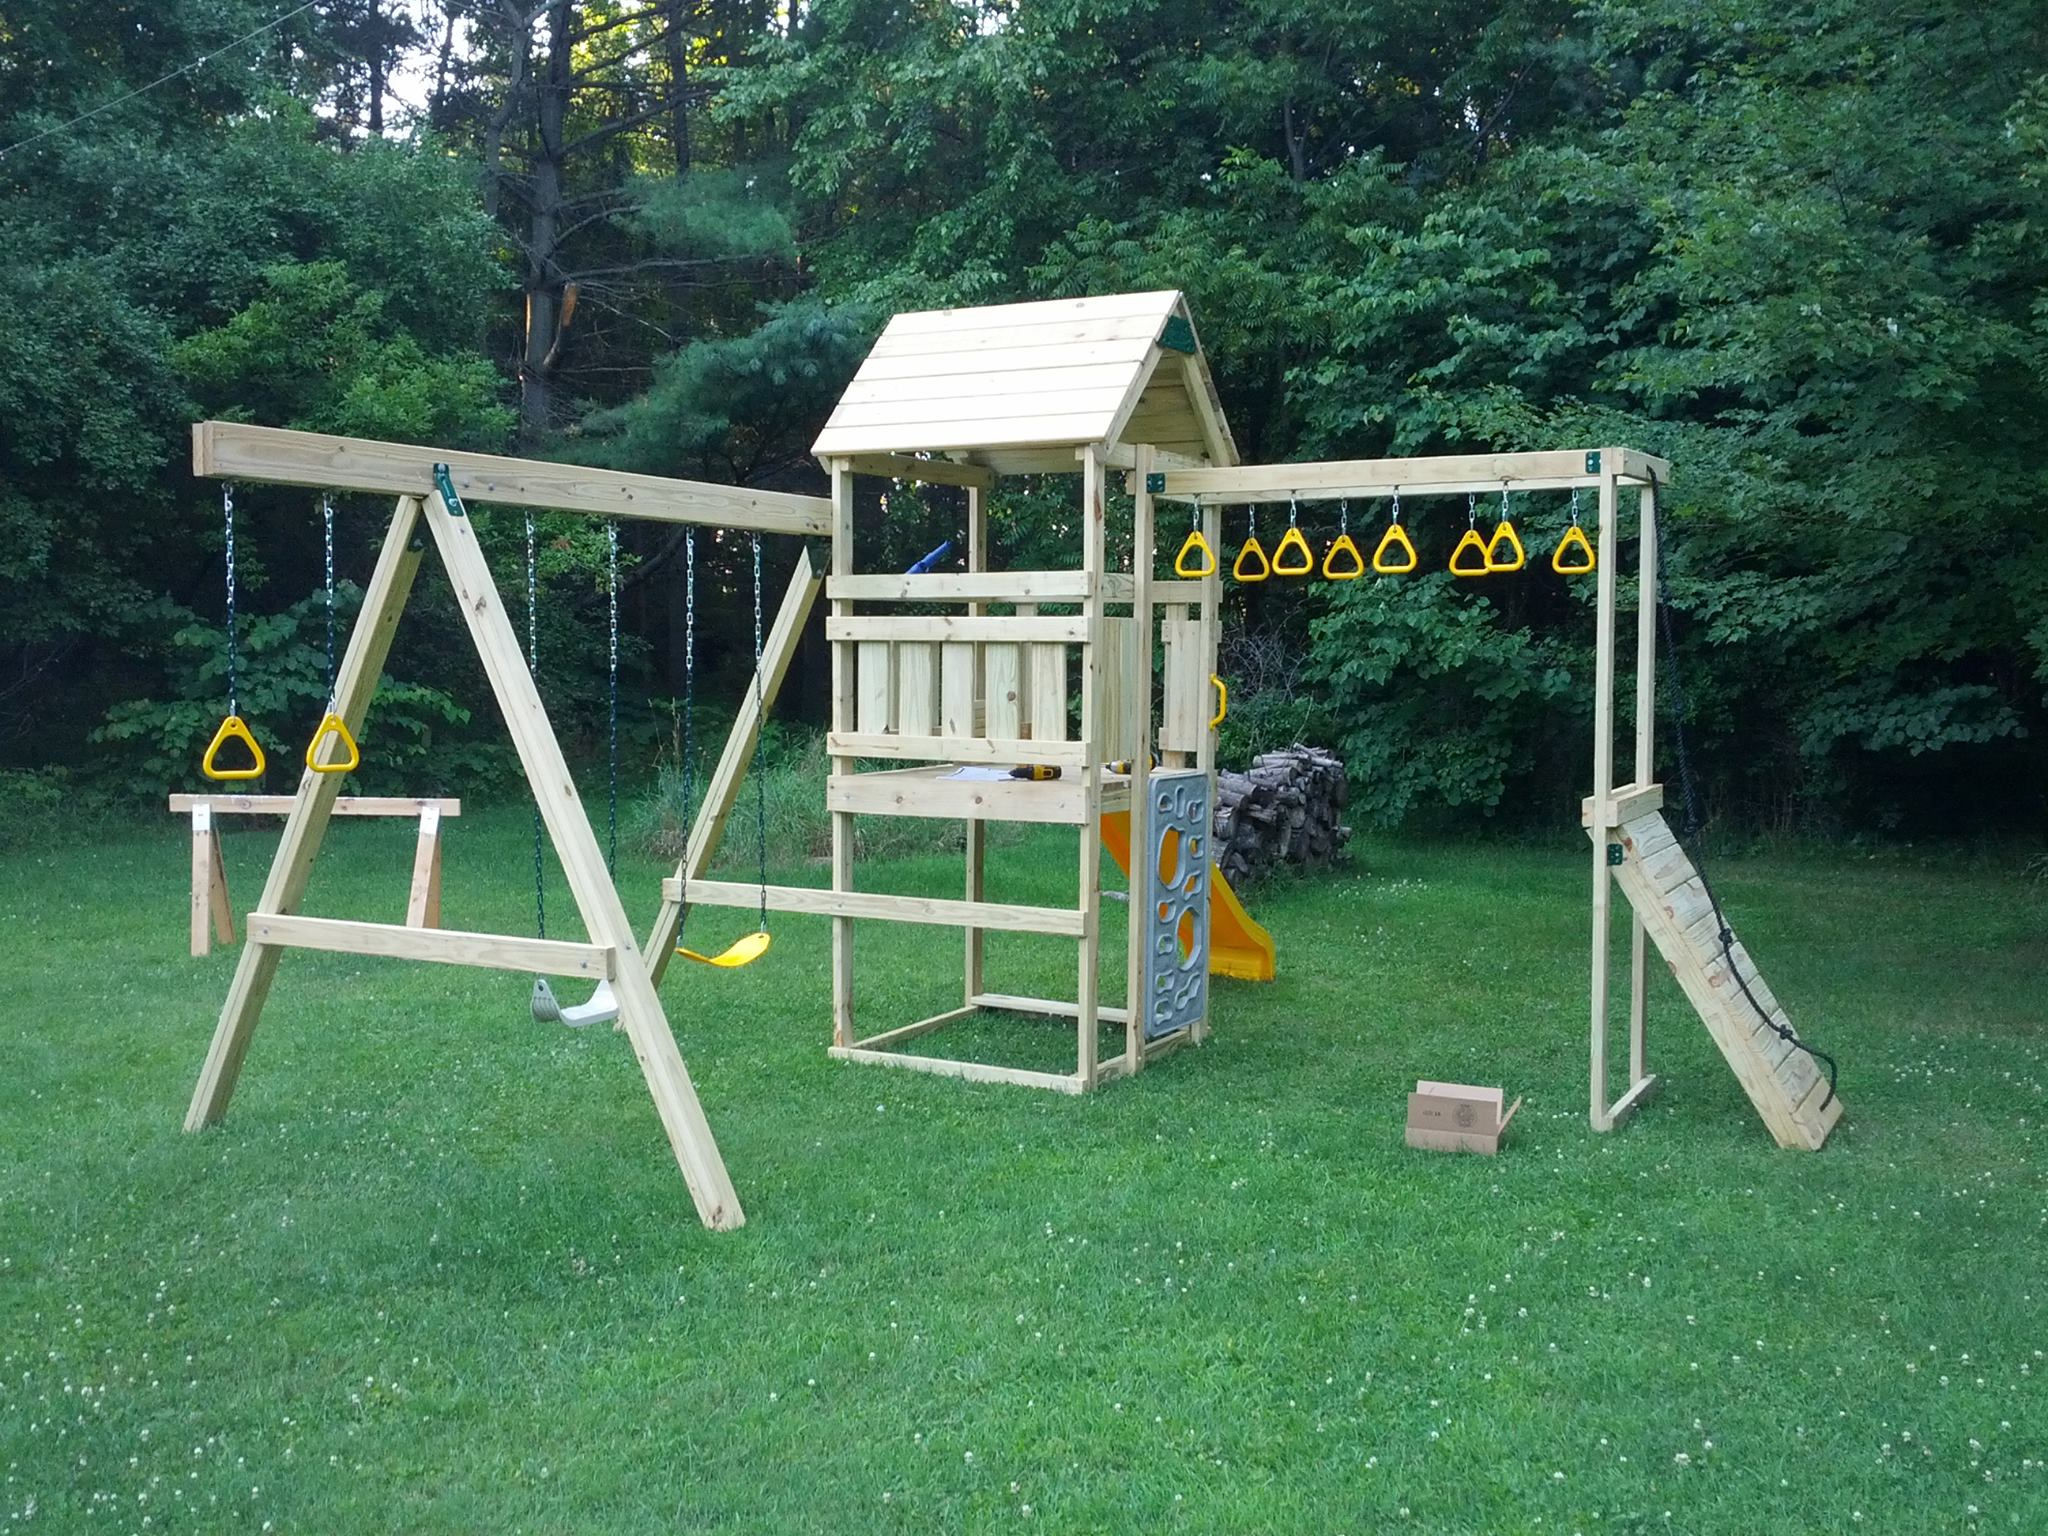
I just purchased and built a PlayStarContenderoutdoor wooden play set in the
“Starter” configuration, purchased at Menards, this
past week. As I developed some strong feelings on various issues
throughout the process, I was moved to write a review. Here it is.
Summary
I'm happy with the play set so far. I think it could have been
engineered better for a substantially similar price. I think the
directions are generally quite good and easy to follow, although
there are some stylistic problems in places. The Menards pull
process was not great, and they didn't supply enough screws.
Despite those flaws, it's sturdy enough, has good play potential,
and my daughter loves it.
I am not disappointed with the money I spent on it, and I think it
represents decent value, but if I had a bit more time and/or I were
going to build another play set, I think I would design one myself.
It would not be substantially difficult to design a play set of
similar quality (better, which is the point) and feature set, and
Playstar sells the hardware that would be difficult to obtain
otherwise separately. (Swing hangers, seats, slides, and the like.)
Engineering
My summation of the engineering of this play set is “sturdy
enough”. If that sounds like damnation with faint praise,
that's a bit strong, but moving in the right direction. The
completed play set, anchored as suggested by the manufacturer, has
not inconsiderable wobble with a single adult on a swing or the
tower platform. While the play set is not intended for an adult to
use its activities (and not really large enough for it anyway), in
my opinion this indicates marginal stiffness.
There are a variety of factors that I believe contribute to this,
but they all basically boil down to one thing: there is no
diagonal bracing. The stiffness of the tower is largely due to
square-mounted rails around the play area. The swing set does
(necessarily) have diagonal bracing, and it is by far the stiffest
part of the play set — unfortunately, where it mounts against
the tower, one of the two legs is elided (using the tower in its
place), robbing the play set of one potential stiff brace. Were I
to redesign this play set, I would use diagonal-braced rails around
the play area on the tower, and place diagonal braces under the
deck. (I will probably augment it with the latter anyway.)
The monkey rings are mounted on a frame that is supported at each
end only by a 90 degree join with no cross bracing whatsoever. This
robs it of most potential to provide stiffness to the overall
structure, and instead requires that the tower lend its stiffness to
the monkey ring support. In my opinion, it should at least
have a plywood corner brace at the far end, if not both. I
understand why it doesn't (it would interfere with the end rings),
but I think it could have been designed to allow for this.
The roof section, which of course bears no load at all and is
mounted all the way at the end of the tower where its overall effect
on stiffness is minimized, is the sturdiest part of the entire
construction. It uses Playstar-branded plastic end pieces that
approximate plywood corner braces.
I will note in passing that nothing in the construction of this set
requires either a mitre or a circular saw, and I think this is
closely related to the lack of suitable bracing. Plywood corner
braces would really ask for a circular saw, and diagonal braces
mitre cuts. I'm sure this is also why the end pieces on the roof
are plastic (as well as, of course, providing a place for branding).
Ease of construction
The kit is a piece of cake to build, from the complexity standpoint.
It's a lot of work, and it takes a lot of hours, but nothing in the
build is complicated The only really difficult part is
standing the tower up when it's completed — that absolutely
requires two adults. (Or at least some sort of mechanical
advantage, and two adults is probably easier.) For the rest of the
construction, I asked for hand here and there to get things tweaked
into place or to hold something while I fastened it, but with a
minimum of cleverness I was able to build it myself it about twice
as long as the instructions suggest it should take two people.
(This says to me that the instructions assume that two moderately
competent people will work in parallel as much as possible.)
That said ... it did take a lot of hours. I didn't keep close
track, but I'm guessing it took me a total of 12-15 hours plus some
extra preparation and cleanup time (as I did it mostly in 2-3 hour
chunks over five days). Having two cordless drills was a huge time
saver (so that one could hold a drill bit and the other a driver
bit, without changing them out), as was a carpenter belt with
pouches for fasteners, tape rule, and writing utensils. (I carried
a number of other things on the belt, but those were the big
winners.)
I followed the Playstar suggestion of cutting all of the lumber up
front, and I think that was a good idea. It kept me from having to
go back to the chop saw over and over. I did have to get it back
out on the second day, though, as one set of cuts used the whole
board, but the “leftover“ part of the board (which was
the play area decking, in my case) was just a fraction of an inch
too long and required trimming. (Funnily, the first board I cut
must have been the shortest of the bunch, as exactly one board was
precisely the right length, so it must have been the one I checked!)
While that was a bit annoying, overall the lumber dimensions were
pretty spot on.
Quality of Instruction
The instructions are pretty easy to follow, with largely
self-evident drawings. In very few places did I have to resort to
reading the text of the instructions, and several times when I did I
hadn't misunderstood the drawings, they just didn't have a great
plan for that point. The one major complaint I have is that the
measurement origins are not very consistent. They
measure all of outside to outside, inside to outside, and
inside to outside dimensions in various places — sometimes on
the same assembly. You have to keep your eyes open. It would be
much better had they standardized on one method.
They also provide check dimensions in only a couple of places (such
as the dimensions between monkey ring hangers, as well as from each
hanger to the end of the board). I would have preferred to see more
of that, as I like to check from more than one point on complex
assemblies. In this vein, they don't provide
angles anywhere except for a few 90 degree corners. I
would have liked to have seen those on the swing assembly (which is
admittedly the only part of the whole thing that isn't square except
the roof, which is obviously 45 degrees).
The instructions spend a lot of time talking about the pattern in
which wood screws should be driven, and they provide a plastic
template for marking those out. I mostly ignored that business,
except for looking to see how many screws they recommended at each
joint. That said, the plastic template did come in handy in a few
places.
Quality of kitting
This one really comes down to Menards, not Playstar. Menards gives
you a BOM and three days to come pick up all of the components.
When I showed up to the lumber yard, the guy who came out to
“help” me was only marginally more familiar with their
lumber yard than I was — and I'd never been there before. (I
mean, a lumber yard is a lumber yard, right?) I carried 90% of the
boards myself, and I had to make two trips inside the store area
(one to the lawn and garden center for the Playstar parts, and one
to the store proper for screws) before I could get out of there.
When I left, a Menards employee had to inventory my trailer before I
could pull out, which would have been less annoying if it hadn't
taken forever to correctly count the 29 2x4s required.
While pulling was a little bit annoying, the really
annoying thing was that they didn't include enough screws. The pull
order listed 6 lbs of #9 2 1/2" screws, which
was about 40 screws short. I didn't break, lose, or strip any
screws, and I used about half a dozen more screws than the
instructions suggested, and I still came up short. This of course
entailed another trip to Menards (I have like 20 lbs of screws
on hand, but of course none of them were deck screws longer than
2"!).
The quality of the Menards-provided screws was great, though. I
think they're Grip-Rite brand, and they had a PoziSquare head. I've
used a lot of this type of screw before, which has a PoziDriv (looks
just like Philips, but isn't, though a Philips bit will work) head
embedded in a Robertson (square drive) head. However, I've always
used it with a square drive bit. This time, I used a PoziSquare bit
that I got with another set of screws someplace else — and
it rocked. I didn't strip or substantially damage a single
screw in about 7 lbs of screws driven, and the only times I lost
good engagement with the screw were due to trying to drive in a
truly unsuitable position. PoziSquare is my new favorite screw
drive.
I bought shop shelving at Menards yesterday to help clean
up the mess of unorganized tools and equipment that is my shop.
When I bought it, I selected the particular unit (this one, I
believe) in part because it had a prominent Made in USA logo on
the advertising signage. This was the same sign that gave the load
limit, dimensions, and such. When I got it home and got it set up,
put some stuff on it, then went to recycle the packaging, I noticed
a block MADE IN CHINA printed on the corner of the packaging. At
this point there was no way I was going to disassemble it and take
it back, but I was not happy.
Today I went in to Menards to double check the situation. The sign
on the display shelving still says Made in USA. The boxes still say
Made in China. I fetched a manager (for which I had to wait about
ten minutes) to show him the situation, and to his credit he
immediately called the merchandising agent (apparently the Edsal
purchasing agent wasn't in his office, whom he tried first) and
verified that this wasn't simply a purchasing mistake — the
shelves were made in USA, and are no longer, and Menards is
aware of this. It was unclear to me (and I think unclear to him)
whether Menards is also aware of the signage problem, but he put in
a request to find out whether there are new signs available, or
corrections for the old signs, or what.
I did not request any sort of compensation, and I was not offered
any. As previously stated, I am unwilling to disassemble and return
the shelves at this point (although part of me certainly wants to),
so it's not clear what demanding compensation would have
meaningfully accomplished. I am somewhat surprised that nothing was
offered, however, in the name of good will.
I'm not very happy with Menards right now, and this will certainly
color my decisions to shop there in the future. Origin of
manufacture isn't something that should be taken for granted, these
days or any other days. When unemployment in the domestic
manufacturing sector is high; when imports from China, specifically,
are shown over and over again to be of substandard quality, to
exploit workers, etc.; and particularly when Made in USA is
being used as an advertising point on store signage, it's
pretty important to get this right. To be clear, I don't think they
meant to put up a false advertisement, but in the end that is indeed
what they did.
I plan to go back in a few days and check the signage. If it's
still incorrect, I'll have to decide what to do about it. It will
almost certainly involve corporate.
The Barnes & NobleNooke-reader
application for Android just spammed me. I haven't run
it in weeks, yet it popped up a notification on my notification bar
(including a vibrating notification like something actually important
had happened) telling me about some sort of magazine sale. This sort
of behavior is not OK.
To make matters the more interesting, I have a review for the Nook
app up on the Play store. I went back to edit it to reduce it to
one star for this transgression, but “an unexpected error has
occurred,” and I'm supposed to try again later. Sure it has.
I have uninstalled the app. I will consider whether to use their
service in the future. Banning them from my commercial life forever
for a single spam might be a bit harsh, but on the other hand, spam
is a huge problem and it is really not OK for them to be spamming
me. If you want to show me advertisements when I run your app,
fine. Notifications when it's not even running? Not so fine.
I just upgraded my
DellXPS 13
Developer Edition (AKA “Sputnik 3”) to
Ubuntu14.04, the newest LTS release,
in order to hopefully clear up some remaining glitches and source
some newer software more easily. So far it seems to have been a
mostly painless process, although there were a few hiccoughs getting
encrypted disks working to my liking. This is how it went.
Preparing for installation
Because the Dell 12.04 image contains a number of third-party
packages, I decided on a wipe-and-reinstall rather than an upgrade.
My experience with various distributions has been that upgrading
from a system with significant third-party package presence in the
core system (such as drivers and X configuration, as was the case
with the Dell image) is asking for trouble.
I have a large, encrypted offline backup disk, so I just booted to
the install live image, mounted that disk,
and dd'd the entire SSD to it. I then
also took an image of only the
encrypted /home partition, for
convenience. This way I have my entire configuration and all
auxiliary data, if I need it, but in the best case scenario I only
have to copy over the home partition and be done with it.
With that out of the way, I just unmounted the backup disk,
unplugged it, and then blew away the partition table. I'm not clear
whether this is ideal from a TRIM point of view or not, but it was
at least fast and easy.
Initial installation
Unlike the
12.04 installer, the Ubuntu 14.04 installer knows about
whole-disk encryption. Unfortunately, the only way it seems to be
able to do it (at least, assuming you want to use LVM) is to encrypt
the entire disk other than /boot as a
single LUKS partition, and then make that partition a LVM physical
volume. This means that every partition on the system is encrypted
under one key, and that it is impossible to create clear
partitions. Well, that's no good. Therefore, I had to work around
the installer again. This time, it was easier because the live
image already knows about both LVM and encrypted volumes.
After determining that the default installer wouldn't do what I
wanted it to do (boring details omitted), I tried a couple of
workarounds before I landed on an actual solution. Unfortunately, I
wasn't able to do a completely encrypted install — I wound up
having to do a clear install and then encrypt it. This does require
more twiddling with config files than I would prefer, but it worked.
First off, I wanted to use LVM but I didn't want to allocate the
entire physical volume to a single logical volume. For some reason,
this is all the installer appears to know how to do. To get around
this, I booted to the live image and partitioned the disk myself. I
created a 256 MB /boot partition,
a 16 GB swap partition, and an LVM physical volume on a
partition spanning the remainder of the disk. On the physical
volume, I created a root partition volume of 30 GB and left the
rest free. That done, I started the installer and installed the
system to the pre-created partitions using manual partitioning.
Setting up encryption
After installing the system, I booted it once and immediately shut
it down to get a plausible /etc/mtab in
place and generally populate things that may populate on boot. I
then rebooted to the live image.
Armed with a ready-to-go disk image, I created another LVM volume
for the encrypted root (named root-crypt) and LUKS formatted it
per my
earlier article on Ubuntu encrypted disks. I then
used cryptsetup to mount it, and
repeated the process for a home volume named home-crypt. These two
volumes are given mapper names of root and home, respectively, when
opened. I then mounted these volumes and populated the root with
the newly installed image and the home volume with my backup image.
For the root volume, I mounted both the installed root and the newly
formatted image in separate directories
under /mnt and copied the data across
with rsync -a. For the home volume I
used dd to put the encrypted image back
byte-for-byte. Having done this, I deleted the unencrypted volume
and then mounted these
filesystems, /boot, and various other
necessary bits as follows:
mount /dev/mapper/root /mnt
mount /dev/mapper/home /mnt/home
mount /dev/sda1 /mnt/boot
for dir in /proc /sys /run /dev; do
    mount -o bind $dir /mnt/$dir
done
This gets enough stuff in place to chroot to the encrypted install
with sudo -H chroot /mnt. Once you're
in, there's a variety of patching up to do before the system is
bootable.
First, for some reason Ubuntu doesn't install cryptsetup by
default. Without it, an encrypted root isn't bootable. It took me
a few minutes to figure that out, actually, because
why wouldn't it be installed? It's installed on the live
image! At any rate, apt-get install
cryptsetup takes care of that.
This will create an /etc/crypttab, but
of course it doesn't know anything about the encrypted volumes that
were just created. Therefore, it
and /etc/fstab have to be patched up
for the new configuration, and
then /etc/mtab has to be brought into
line so that update-initramfs will be
able to do its job. For the first two files, they should look
something like this (after prepping encrypted swap, per my previous
article):
The third, /etc/mtab, has to be fixed
up to reflect the above mountings, which should be pretty
straightforward. The old device names simply have to be replaced
with the new mapper names.
With the filesystems
configured, update-initramfs can be
used to generate an initial RAM disk that has encrypted disk
capabilities, and then update-grub can
be used to fix up the root drive at bootup, as follows:
update-initramfs -k all -u
update-grub
At this point, the system should boot, and ask for three passphrases
on the way. Unlike 12.04, it even does it without undue graphical
glitchery!
Fixing up features
This section will probably change as I locate more broken stuff, but
so far it really has only required fixing hibernate and the touchpad
(which is admittedly a biggie!).
First, the touchpad. For some reason,
the i2c_hid module prevents multitouch
from working on the touchpad, and generally causes it to be a little
bit spastic. Fixing this is as simple as blacklisting the offending
module. To do this, create
a /etc/modprobe.d/blacklist-i2c_hid.conf
file and place the single line blacklist
i2c_hid in it. On the next reboot, it won't muck things up
and synclient can be used
to configure
the touchpad the same as in 12.04.
The good news about hibernate is that it's a lot easier than it was
in 12.04! All I had to do to get it working was
edit /etc/initramfs-tools/conf.d/resume
to point to the new encrypted swap device, rebuild the initial RAM
disk again, and it seems to work fine. For some reason I have to
decrypt both the root disk and the swap disk on resume (in 12.04 I
only had to decrypt the swap disk), but that doesn't seem like a big
deal.
Update 2014-04-26:
The rsync-across method for achieving
separately encrypted LVM volumes did have some collateral damage
— rsync does not preserve
capabilities. This first manifested itself as an inability for
non-root users to ping, receiving the error message “ping:
icmp open socket: Operation not permitted”. I fixed this by
removing the ping package (which took with it ubuntu-minimal) and
reinstalling it via ubuntu-minimal, which restored
the cap_net_raw capability. There may
be other, harder-to-fix permissions problems to deal with in the
future. We shall see.
Impressions
I'll admit that I basically didn't even look at the new default UI.
I just installed my bevy of usual packages and logged right back
into fvwm. I therefore can't say much about that.
However, I have been pleased with the Just Workingness of all the
other stuff I've used so far, modulo the encrypted disk setup pain
documented above. It also seemed less painful than 12.04 was, but
that may just be because I've been through this rodeo recently. The
fact that the wireless works on the live image and that it contains
all of the packages I needed to hack up the setup out of the box
make things seem easier, for sure. The (relative)
simplicity of getting encrypted hibernate going was a big bonus,
too. They're within epsilon of having it work configuration-free!
It's only been a few hours. There may be some time bombs in here I
don't know about yet.