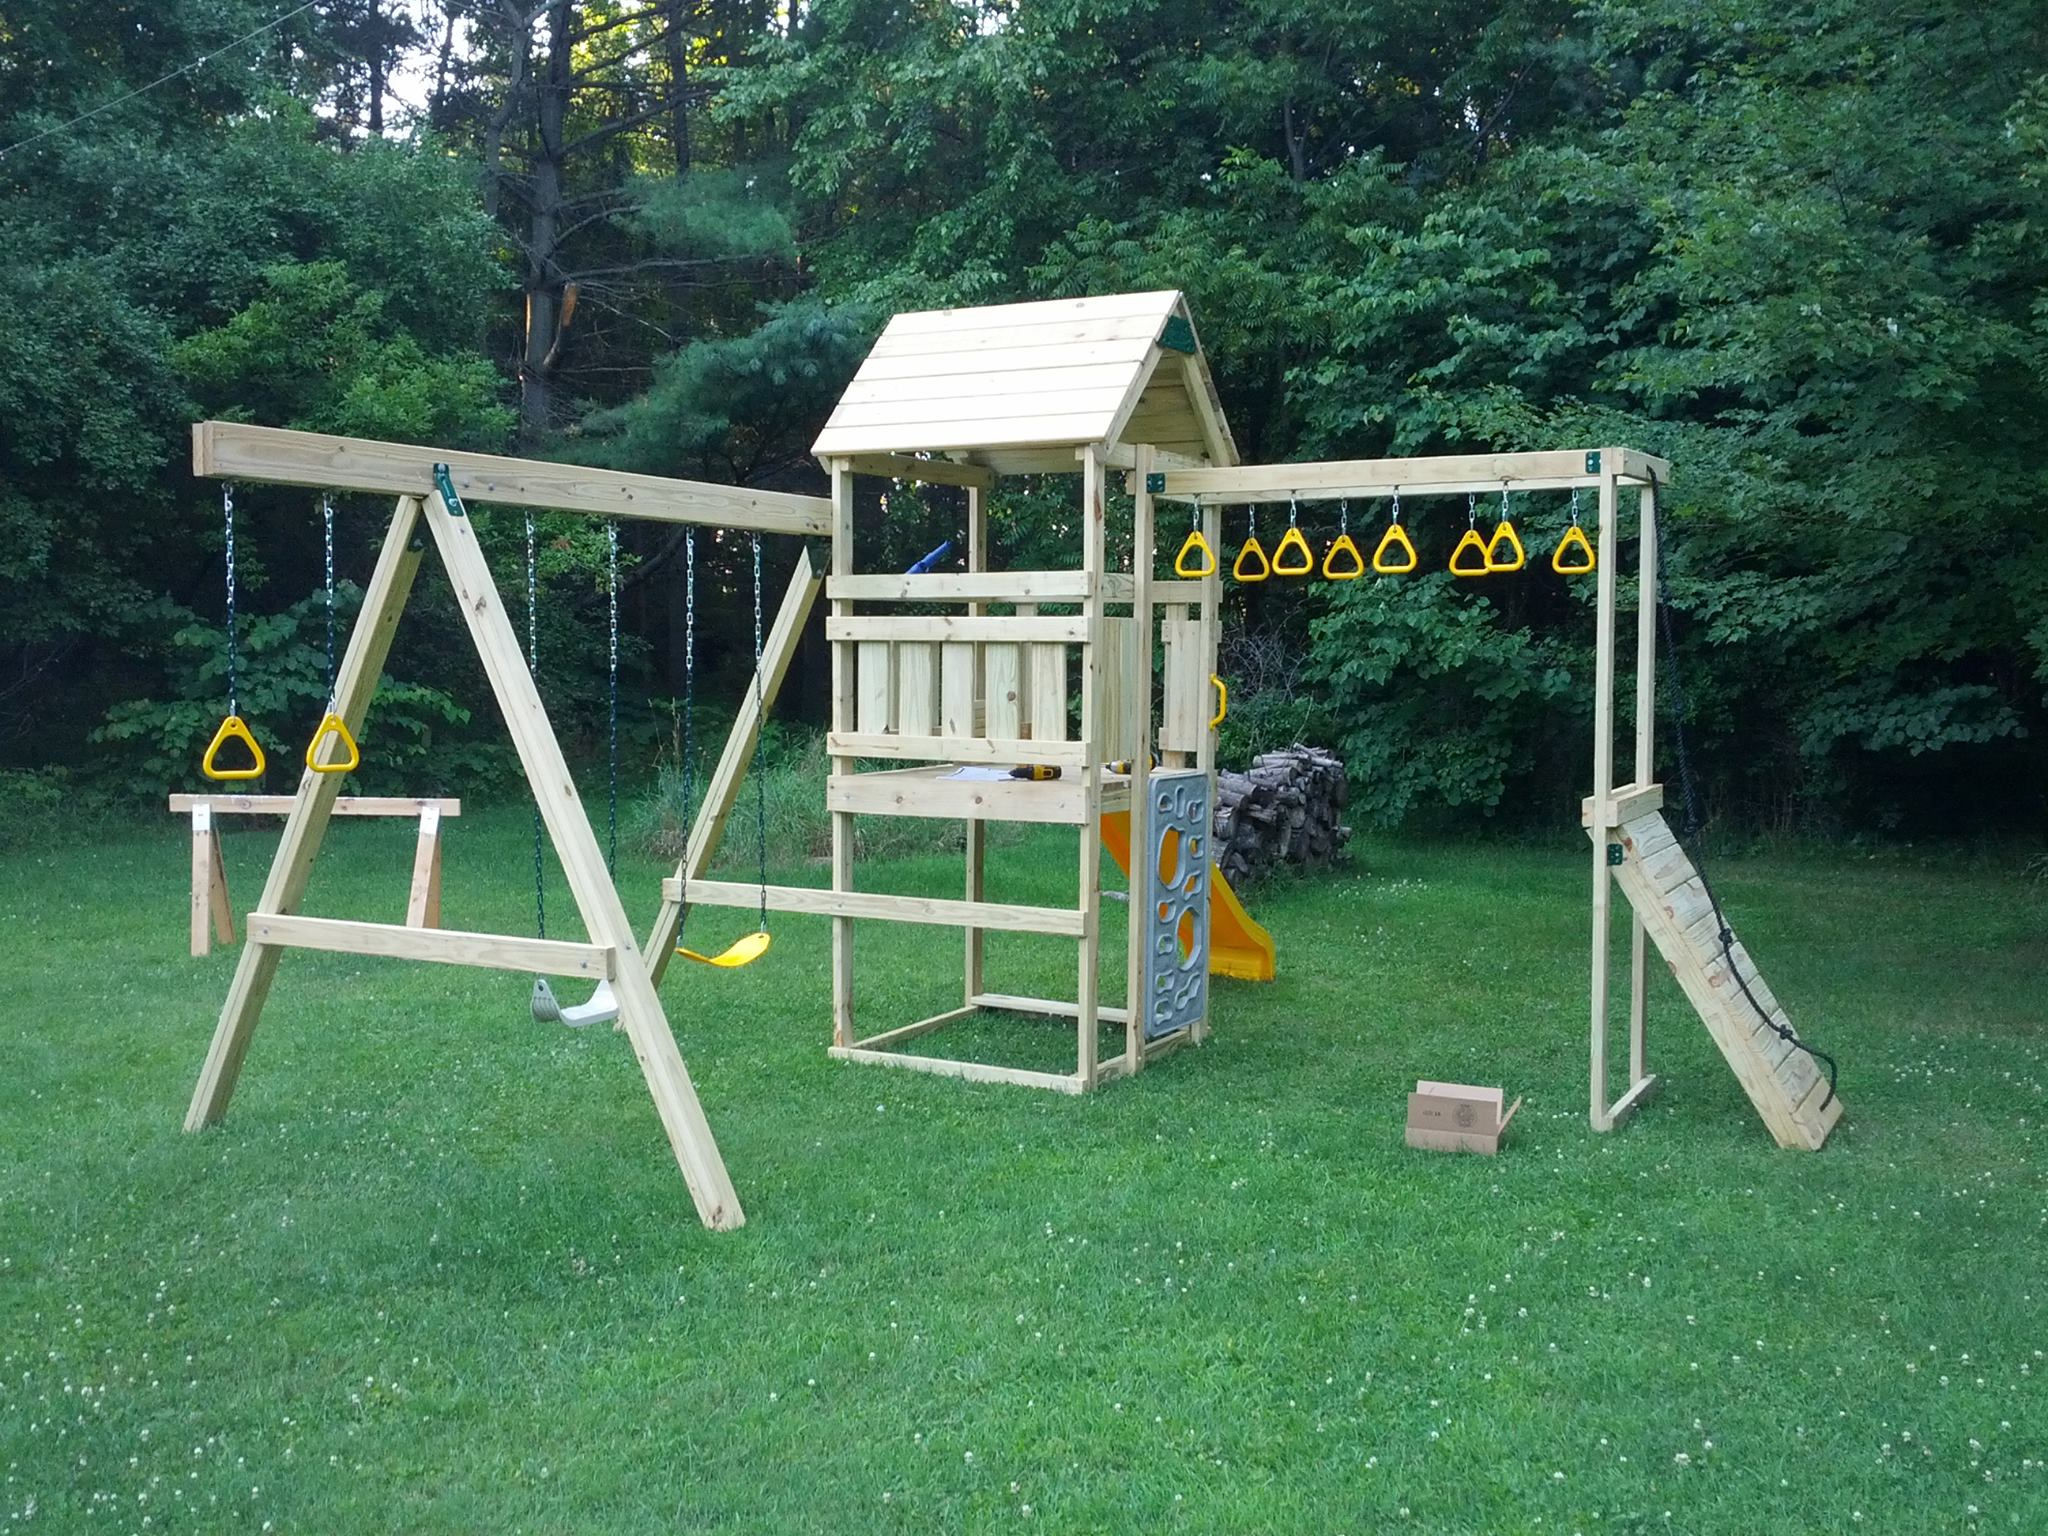
I just purchased and built a PlayStar Contender outdoor wooden play set in the “Starter” configuration, purchased at Menards, this past week. As I developed some strong feelings on various issues throughout the process, I was moved to write a review. Here it is.
Summary
I'm happy with the play set so far. I think it could have been engineered better for a substantially similar price. I think the directions are generally quite good and easy to follow, although there are some stylistic problems in places. The Menards pull process was not great, and they didn't supply enough screws. Despite those flaws, it's sturdy enough, has good play potential, and my daughter loves it.
I am not disappointed with the money I spent on it, and I think it represents decent value, but if I had a bit more time and/or I were going to build another play set, I think I would design one myself. It would not be substantially difficult to design a play set of similar quality (better, which is the point) and feature set, and Playstar sells the hardware that would be difficult to obtain otherwise separately. (Swing hangers, seats, slides, and the like.)
Engineering
My summation of the engineering of this play set is “sturdy enough”. If that sounds like damnation with faint praise, that's a bit strong, but moving in the right direction. The completed play set, anchored as suggested by the manufacturer, has not inconsiderable wobble with a single adult on a swing or the tower platform. While the play set is not intended for an adult to use its activities (and not really large enough for it anyway), in my opinion this indicates marginal stiffness.
There are a variety of factors that I believe contribute to this, but they all basically boil down to one thing: there is no diagonal bracing. The stiffness of the tower is largely due to square-mounted rails around the play area. The swing set does (necessarily) have diagonal bracing, and it is by far the stiffest part of the play set — unfortunately, where it mounts against the tower, one of the two legs is elided (using the tower in its place), robbing the play set of one potential stiff brace. Were I to redesign this play set, I would use diagonal-braced rails around the play area on the tower, and place diagonal braces under the deck. (I will probably augment it with the latter anyway.)
The monkey rings are mounted on a frame that is supported at each end only by a 90 degree join with no cross bracing whatsoever. This robs it of most potential to provide stiffness to the overall structure, and instead requires that the tower lend its stiffness to the monkey ring support. In my opinion, it should at least have a plywood corner brace at the far end, if not both. I understand why it doesn't (it would interfere with the end rings), but I think it could have been designed to allow for this.
The roof section, which of course bears no load at all and is mounted all the way at the end of the tower where its overall effect on stiffness is minimized, is the sturdiest part of the entire construction. It uses Playstar-branded plastic end pieces that approximate plywood corner braces.
I will note in passing that nothing in the construction of this set requires either a mitre or a circular saw, and I think this is closely related to the lack of suitable bracing. Plywood corner braces would really ask for a circular saw, and diagonal braces mitre cuts. I'm sure this is also why the end pieces on the roof are plastic (as well as, of course, providing a place for branding).
Ease of construction
The kit is a piece of cake to build, from the complexity standpoint. It's a lot of work, and it takes a lot of hours, but nothing in the build is complicated The only really difficult part is standing the tower up when it's completed — that absolutely requires two adults. (Or at least some sort of mechanical advantage, and two adults is probably easier.) For the rest of the construction, I asked for hand here and there to get things tweaked into place or to hold something while I fastened it, but with a minimum of cleverness I was able to build it myself it about twice as long as the instructions suggest it should take two people. (This says to me that the instructions assume that two moderately competent people will work in parallel as much as possible.)
That said ... it did take a lot of hours. I didn't keep close track, but I'm guessing it took me a total of 12-15 hours plus some extra preparation and cleanup time (as I did it mostly in 2-3 hour chunks over five days). Having two cordless drills was a huge time saver (so that one could hold a drill bit and the other a driver bit, without changing them out), as was a carpenter belt with pouches for fasteners, tape rule, and writing utensils. (I carried a number of other things on the belt, but those were the big winners.)
I followed the Playstar suggestion of cutting all of the lumber up front, and I think that was a good idea. It kept me from having to go back to the chop saw over and over. I did have to get it back out on the second day, though, as one set of cuts used the whole board, but the “leftover“ part of the board (which was the play area decking, in my case) was just a fraction of an inch too long and required trimming. (Funnily, the first board I cut must have been the shortest of the bunch, as exactly one board was precisely the right length, so it must have been the one I checked!) While that was a bit annoying, overall the lumber dimensions were pretty spot on.
Quality of Instruction
The instructions are pretty easy to follow, with largely self-evident drawings. In very few places did I have to resort to reading the text of the instructions, and several times when I did I hadn't misunderstood the drawings, they just didn't have a great plan for that point. The one major complaint I have is that the measurement origins are not very consistent. They measure all of outside to outside, inside to outside, and inside to outside dimensions in various places — sometimes on the same assembly. You have to keep your eyes open. It would be much better had they standardized on one method.
They also provide check dimensions in only a couple of places (such as the dimensions between monkey ring hangers, as well as from each hanger to the end of the board). I would have preferred to see more of that, as I like to check from more than one point on complex assemblies. In this vein, they don't provide angles anywhere except for a few 90 degree corners. I would have liked to have seen those on the swing assembly (which is admittedly the only part of the whole thing that isn't square except the roof, which is obviously 45 degrees).
The instructions spend a lot of time talking about the pattern in which wood screws should be driven, and they provide a plastic template for marking those out. I mostly ignored that business, except for looking to see how many screws they recommended at each joint. That said, the plastic template did come in handy in a few places.
Quality of kitting
This one really comes down to Menards, not Playstar. Menards gives you a BOM and three days to come pick up all of the components. When I showed up to the lumber yard, the guy who came out to “help” me was only marginally more familiar with their lumber yard than I was — and I'd never been there before. (I mean, a lumber yard is a lumber yard, right?) I carried 90% of the boards myself, and I had to make two trips inside the store area (one to the lawn and garden center for the Playstar parts, and one to the store proper for screws) before I could get out of there. When I left, a Menards employee had to inventory my trailer before I could pull out, which would have been less annoying if it hadn't taken forever to correctly count the 29 2x4s required.
While pulling was a little bit annoying, the really annoying thing was that they didn't include enough screws. The pull order listed 6 lbs of #9 2 1/2" screws, which was about 40 screws short. I didn't break, lose, or strip any screws, and I used about half a dozen more screws than the instructions suggested, and I still came up short. This of course entailed another trip to Menards (I have like 20 lbs of screws on hand, but of course none of them were deck screws longer than 2"!).
The quality of the Menards-provided screws was great, though. I think they're Grip-Rite brand, and they had a PoziSquare head. I've used a lot of this type of screw before, which has a PoziDriv (looks just like Philips, but isn't, though a Philips bit will work) head embedded in a Robertson (square drive) head. However, I've always used it with a square drive bit. This time, I used a PoziSquare bit that I got with another set of screws someplace else — and it rocked. I didn't strip or substantially damage a single screw in about 7 lbs of screws driven, and the only times I lost good engagement with the screw were due to trying to drive in a truly unsuitable position. PoziSquare is my new favorite screw drive.