I’ve been doing some uploading
to YouTube
lately, and because my Internet connection is presently somewhat
terrible1, I have found need to slow
down my video uploads. There is no obvious way to do that in the
YouTube interface, but it turns out you can do it easily in Google
Chrome.
To slow down any web page, YouTube included, open up the
Developer Tools sidebar in your Chrome browser by going to the three
dots menu at the far right of the menu bar, selecting More
tools and then Developer tools. From there, pull
down the three dots menu in the Developer Tools pane and,
confusingly, select More tools again followed
by Network conditions. This will open up a small sub-pane
with a dropdown labeled “Network throttling”.
This dropdown is intended to simulate connecting over
less-than-ideal network connections, but it can also be used to cap
utilization to something below your own less-than-ideal network
connection. Drop down the list of throttling options,
select Add in the Custom section, and create a connection
with limits somewhat less than your Internet service —
something like 1/2 to 2/3 your provider rate should be good. In my
case, upload is the problem, so I set the download rate very high
and the upload rate to about 1/2 my provisioned upload.
Now, when you need to throttle a page, open Developer Tools and the
Network conditions panel and select your custom configuration for
Network throttling. It will take a few moments to take effect for
established connections, but it should make your concurrent browsing
experience much better.
1 Because it's
the only broadband provider I can get at my current location, I pay
too much money for too poor a connection from Time Warner Cable. I
realize they don't technically exist any more, but that's what my
bill says. The upload is only 1.25 Mbps, which might as well
be dialup, and I am paying nearly $40/month for the privilege.
Sheesh.
I bought a “new” computer this week — motherboard,
processor, memory, and video card — because I have been
experiencing memory pressure on some of my work loads lately and I
really didn’t want to go over 16 GB of non-ECC RAM. My
old processor and chipset (Intel Core i5-2300 on H67) didn’t
support ECC RAM, so I needed to upgrade the whole shebang. I wound
up selecting an IntelXeon
e5-2620 v4
8-core processor, 32 GB of
Crucial
RAM, and an ASRockFatal1ty X99X
Killer (I know, I
know) motherboard,
with an MSIGeForce GT 710
video adapter. The processor, motherboard, and RAM were purchased
for performance and power consumption, the video adapter was
purchased based primarily on power consumption; it seems very
difficult to buy a truly low-power desktop card these days, and my
GPU usage is quite minimal. Unfortunately, this system was not as
plug-and-play as I had hoped, and this is the story of the problem
and how I’ve (hopefully) fixed it.
Things seemed to start off well, with the machine performing as
expected (each core seems to perform similarly to, or maybe about
5% faster than, each core in my i5-2300 for loads I care about,
but there are twice as many cores plus twice as many again
hyperthreading contexts). The first thing I did upon receipt was
update the BIOS (as I had read that some X99 boards required update
for Broadwell CPUs, although it did boot to BIOS and update itself
without any trouble — props to ASRock for that, by the way,
network update from BIOS was convenient), and before swapping the
boards I had installed a 4.8.0 kernel from Debian Jessie backports.
Initial power up was no trouble at all.
Unfortunately, after several hours one of the cores locked up,
issuing the error NMI watchdog: BUG: soft
lockup - CPU#12 stuck for 22s!, and Chrome became
unresponsive. A short time after this other CPUs started reporting
soft lockups, and the dumps looked something like this (included so
that searching might find this if it's relevant):
Jan 12 18:23:20 colt kernel: [ 6484.590710] CPU: 11 PID: 31903 Comm: chrome Tainted: G            E   4.8.0-0.bpo.2-amd64 #1 Debian 4.8.11-1~bpo8+1
Jan 12 18:23:20 colt kernel: [ 6484.590711] Hardware name: To Be Filled By O.E.M. To Be Filled By O.E.M./X99X Killer, BIOS P3.10 07/01/2016
Jan 12 18:23:20 colt kernel: [ 6484.590712] task: ffff920ca14f3000 task.stack: ffff920c50e40000
Jan 12 18:23:20 colt kernel: [ 6484.590713] RIP: 0010:[]  [] smp_call_function_many+0x1f1/0x250
Jan 12 18:23:20 colt kernel: [ 6484.590719] RSP: 0018:ffff920c50e43c58  EFLAGS: 00000202
Jan 12 18:23:20 colt kernel: [ 6484.590720] RAX: 0000000000000003 RBX: 0000000000000200 RCX: 0000000000000000
Jan 12 18:23:20 colt kernel: [ 6484.590721] RDX: ffffda387fa03020 RSI: 0000000000000200 RDI: ffff920cff4d9688
Jan 12 18:23:20 colt kernel: [ 6484.590721] RBP: ffff920cff4d9688 R08: ffffffffffffffff R09: 0000000000000000
Jan 12 18:23:20 colt kernel: [ 6484.590722] R10: 0000000000000008 R11: 0000000000000246 R12: ffff920cff4d9680
Jan 12 18:23:20 colt kernel: [ 6484.590723] R13: ffffffffa4e6d990 R14: 0000000000000000 R15: 0000000000000001
Jan 12 18:23:20 colt kernel: [ 6484.590724] FS:  00007f617a98da00(0000) GS:ffff920cff4c0000(0000) knlGS:0000000000000000
Jan 12 18:23:20 colt kernel: [ 6484.590725] CS:  0010 DS: 0000 ES: 0000 CR0: 0000000080050033
Jan 12 18:23:20 colt kernel: [ 6484.590725] CR2: 0000188f77c3b000 CR3: 00000007d9b00000 CR4: 00000000003426e0
Jan 12 18:23:20 colt kernel: [ 6484.590727] DR0: 0000000000000000 DR1: 0000000000000000 DR2: 0000000000000000
Jan 12 18:23:20 colt kernel: [ 6484.590727] DR3: 0000000000000000 DR6: 00000000fffe0ff0 DR7: 0000000000000400
Jan 12 18:23:20 colt kernel: [ 6484.590728] Stack:
Jan 12 18:23:20 colt kernel: [ 6484.590729]  0000000000019640 0000000100000000 ffff920cc132e700 ffffffffa4e6d990
Jan 12 18:23:20 colt kernel: [ 6484.590731]  0000000000000000 ffff920c50e43d50 ffff920c50e43d58 ffff920c50e43cb0
Jan 12 18:23:20 colt kernel: [ 6484.590733]  ffffffffa4f004b8 ffff920cc132e700 ffff920c50e43d00 ffff920cff5d4828
Jan 12 18:23:20 colt kernel: [ 6484.590735] Call Trace:
Jan 12 18:23:20 colt kernel: [ 6484.590739]  [] ? leave_mm+0xc0/0xc0
Jan 12 18:23:20 colt kernel: [ 6484.590741]  [] ? on_each_cpu+0x28/0x50
Jan 12 18:23:20 colt kernel: [ 6484.590743]  [] ? flush_tlb_kernel_range+0x48/0x90
Jan 12 18:23:20 colt kernel: [ 6484.590746]  [] ? __purge_vmap_area_lazy+0xba/0x2f0
Jan 12 18:23:20 colt kernel: [ 6484.590748]  [] ? vm_unmap_aliases+0x118/0x140
Jan 12 18:23:20 colt kernel: [ 6484.590750]  [] ? change_page_attr_set_clr+0xef/0x450
Jan 12 18:23:20 colt kernel: [ 6484.590752]  [] ? set_memory_ro+0x2d/0x40
Jan 12 18:23:20 colt kernel: [ 6484.590755]  [] ? bpf_prog_select_runtime+0x25/0xc0
Jan 12 18:23:20 colt kernel: [ 6484.590758]  [] ? bpf_prepare_filter+0x2ef/0x3f0
Jan 12 18:23:20 colt kernel: [ 6484.590761]  [] ? kmemdup+0x32/0x40
Jan 12 18:23:20 colt kernel: [ 6484.590762]  [] ? bpf_prog_create_from_user+0xd0/0x120
Jan 12 18:23:20 colt kernel: [ 6484.590767]  [] ? proc_watchdog_cpumask+0xd0/0xd0
Jan 12 18:23:20 colt kernel: [ 6484.590768]  [] ? do_seccomp+0x109/0x6b0
Jan 12 18:23:20 colt kernel: [ 6484.590772]  [] ? system_call_fast_compare_end+0xc/0x96
I showed some of the errors to
Rik van Riel who
thought that the dumps, in totality, looked like a possible CPU idle
management bug and suggested booting with the kernel
option intel_idle.max_cstate=0 to use
the ACPI idle management instead of the Linux native Intel chip idle
management code. Long story short, this did succeed in changing the
idle management, but didn't fix the problem. I backed this change
out, because it prevented the CPU from descending to the deep sleep
I like seeing for power savings.
We had also discussed the possibility that this was a
graphics-related bug, and I disabled accelerated rendering in
Chrome. However, it didn't seem to have an effect, and soon I wound
up with the same soft lockup problems. At some point Rik asked if I
might have a SATA 6 Gbps drive on a 3 Gbps cable, which
reminded me that I had moved some drives from a 3 Gbps
controller to a 6 Gbps controller in the upgrade, so I forced
those to the slower SATA 2 speeds with another kernel option
— libata.force=3:3.0,4:3.0. This
option causes the kernel to force ata3 and ata4 (the two drives in
question) to a 3 Gbps connection. Sadly, this wasn't the
problem either, and the soft lockups persisted. It was probably a
good idea until I check their cables, however (and won't matter much
as they're spinning platter drives), so I left it in.
I had been becoming increasingly suspicious of the video card
through all of this. I should mention that one of the first things
I did was run memtest86+ for a couple of hours to try to rule out
general processor/memory problems, and it ran without trouble. That
pretty much left the video card or the software (or the video card
software, as it turned out), in my mind, as the likely culprits. I
do have another, more powerful GPU in a static bag in the basement
(that I removed from another machine years ago to save the power
draw), and I considered putting it in. However, before I did that,
I decided that I should try the software solution of
replacing the open source Nouveau drivers for NVIDIA video cards
with the closed source, proprietary NVIDIA drivers.
I am sad to say that this appears to have fixed the problem. Only
time will tell (as some of the lockups took several hours to come to
fruition), but the machine has been running without error for almost
17 hours. This included an hour or so of running as close to
100% CPU utilization as I could get (16 threads of melt, 16 jobs in
a compile, rendering four simultaneous 1080p29.97fps H.264 videos),
during which temperatures remained very acceptable and no glitches
presented.
So ... if you're seeing soft lockups using Nouveau on a 4.8.0 kernel
(or some similar combination thereof), you may wish to consider
either an alternate video adapter or the proprietary NVIDIA drivers.
I'll be reporting this, so hopefully it is fixed soon. As an added
bonus, the NVIDIA drivers cause the video card to run about
10% cooler (about 50 °C versus about 55 °C),
which I have to assume means it's drawing less power. Either way,
it's too power hungry!
I have a love-hate relationship with LVM. When it’s working, it’s
awesome. Every time something fails, though, it’s a nightmare and I
hate it. It always restores everything without data loss, which is
the key, but it doesn’t make it easy. Today I lost a physical
volume used by my primary volume group, restored it, and had some
trouble getting it back online. This is the story of how I did so,
since I couldn’t find any easy instructions or others with quite the
same problem.
First off, let’s establish that the fundamental problem was PEBKAC
— or in this case, PEBCAF: Problem Exists between Computer and
Floor. I was replacing a fan in the front of my case that had
started groaning, and I chose to do it without powering down the
computer. In the process, I knocked the power cable off one of the
drives in my volume group, causing it to go “missing”
(as it should have). It regrettably wasn’t marked hot swap in the
BIOS, so plugging it back in didn’t restore it to working order.
Not thinking much about it, I just did a graceful reboot expecting
it to come right back up.
It didn’t. When the computer booted, it failed to mount a number of
volumes, as one or more of their mirrors were stored on a missing
PV. Except that the PV wasn’t missing — pvck showed the volume metadata fine, the
disk showed up in the device table, and pvs showed the disk, but with the missing
flag. I tried a variety of obvious commands to straighten things
out (pvck, vgck, vgchange
-ay, etc., etc.), but everything ultimately failed
with a report of a missing volume.
Then I did something else stupid, which I was fortunately prevented
from completing — I tried to use pvcreate (with -ff, no less!) to restore the volume metadata
from backup. LVM wouldn’t do that, though, complaining that the
volume was in use. I think that might have destroyed my chances of
getting it back online, so fortunately it didn’t work.
One of the commands I had tried that I really expected to work
— since the disk actually was there — was vgcfgrestore. It failed, too, though,
complaining about the same missing PV. At some point it occurred to
me to look at the backup file. Lo and behold, what did I find but
this:
                pv1 {
                        id = "71713b2f-46b7-45c2-8b33-8ef8ccd901ea"
                        device = "/dev/sda1"    # Hint only

                        status = ["ALLOCATABLE"]
                        flags = ["MISSING"]
                        dev_size = 1953521664   # 931.512 Gigabytes
                        pe_start = 2048
                        pe_count = 238466       # 931.508 Gigabytes
                }
To make a long story short, after removing the MISSING flag, vgcfgrestore did exactly what it was supposed
to do, and the volume group was restored to full functionality.
I’m not sure, but I think the problem is that the clean shutdown
with a missing volume saved a backup that thought the volume was
missing, so I was trying to restore a backup with the same volume
missing. That doesn’t seem like it’s the behavior that anyone would
ever want, but there it is. If you ever have this problem, check
your volume group configuration backup.
Since versions and such matter for this sort of advice, this was on
Debian Jessie with LVM 2.02.111-2.2+deb8u1.
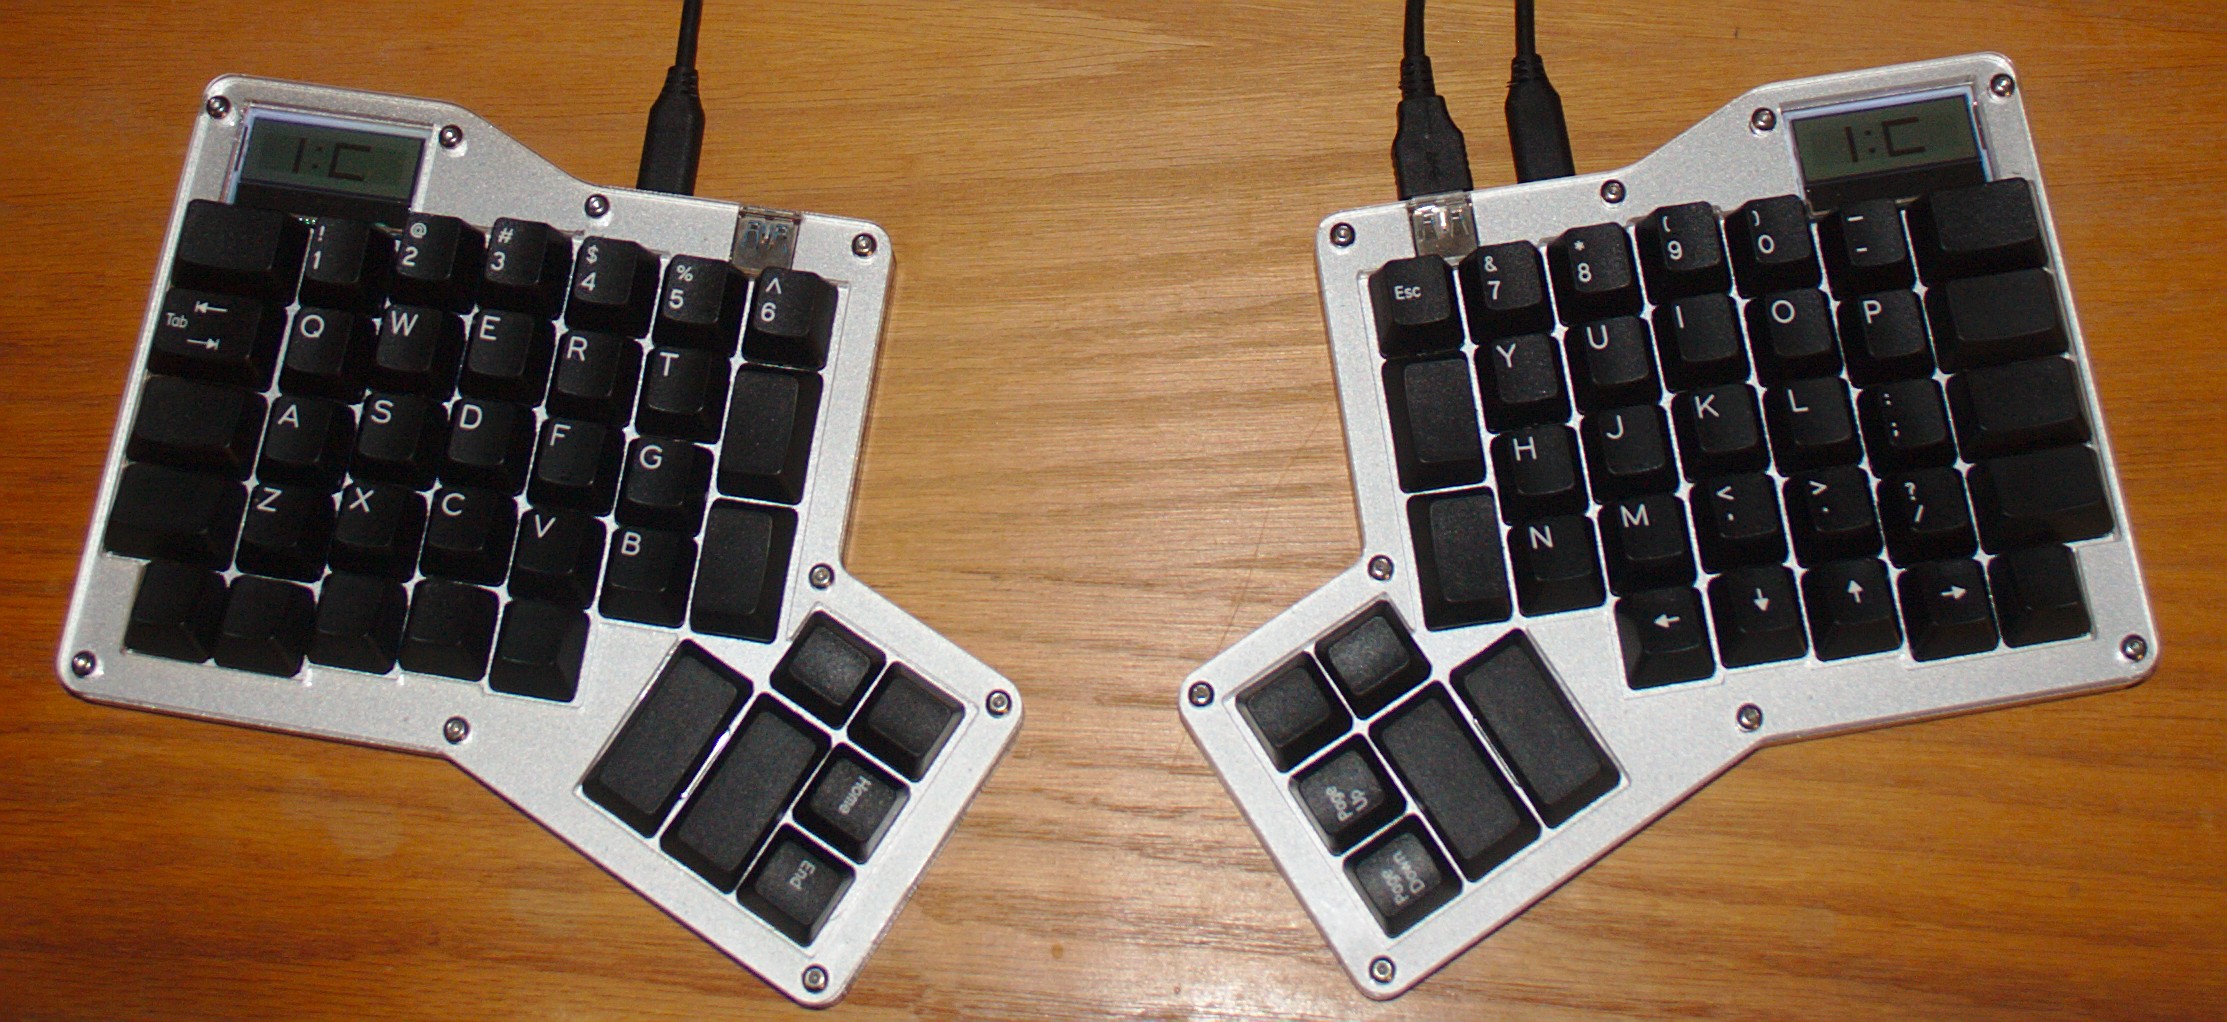
I’ve been typing on my Input ClubInfinity ErgoDox for about two
weeks now, and I can confirm most of my initial impressions.
(See my
original review.) It is indeed quite nice to type on, and
coming up to speed and comfort was not terribly difficult or
time-consuming.
I am currently typing this review on my laptop
(a Dell
XPS 13 that I have previously reviewed), which of course
has a membrane traditional QWERTY keyboard. I will make some
comparison comments in this review.
Key placement
As I mentioned in my first impressions, the biggest slowdown in
getting situated was the ortholinear key layout, not the thumb
clusters or the keys that are simply in a different location —
although I remapped a lot of those to bring them back to their
QWERTY-ish homes. It took several days or a week to stop
mis-striking keys due to their differing distance from their usual
position, and some specific sequences
(e.g., cd, as previously
discussed) still give me trouble from time to time. I will confess
that I have not been doing a lot of programming; I expect the
location of the square/curly bracket keys (which I have inboard of T
and Y) to rear its ugly head for a while when I have my next large
programming stint.
The distance from the finger keys to the thumb cluster remains
slightly non-ideal for my hands. My left thumb still wants to fall
somewhere between the location of the inner and outer thumb bars,
leading my spaces to occasionally immediately be backspaced (I have
space on the inner key and backspace on the outer on that side). I
don’t seem to have this problem on the right hand. I have also
gotten much better at avoiding it with time, although it took a
concerted effort.
I note that, using a traditional keyboard, I now have some of these
same problems in reverse! In particular, I keep trying to hit
backspace and enter with my thumbs. I also notice that my left
thumb is pulled in closer to the fingers than I used to hold it,
probably due to the thumb cluster distance issue mentioned above. I
have also whacked the trackpad more than once trying to hit
backspace.
I have not modified my layout since the first or second day of using
the keyboard. My layout is pretty QWERTY-ish, except for the thumb
clusters, square brackets, the key left of 7 on the right hand
(which I have mapped to ESC), and the arrow keys (which are in the
ErgoDox traditional position, replacing the right-hand modifiers).
I did place the Pause key in the lower right corner of the
right-hand board, as I use that key to lock my screen and wanted
easy access to it without looking. (I originally chose it because
this is trivial on a full 104-key layout.)
Mechanical switch feel
I was pleased to be moving to a mechanical switch keyboard, but to
be honest, that wasn’t one of my primary considerations in choosing
the ICED. I was more more concerned about the ergonomics of the
keyboard, and offloading some of those long pinky reaches to my
under-used thumbs. However, the CherryMX Brown switches have been a
delight. Their importance has risen in my estimation since I got
the keyboard. I never noticed it during my initial break-in (when
the Infinity ErgoDox was the only keyboard I was using, more or
less), but I noticed it immediately upon returning to a membrane
laptop keyboard — the membrane keyboard feels (relatively
speaking) terrible! It also seems to fatigue my fingers more. I
believe this is due to the relatively light (45 cN, lighter
than the popular Clear or Blue variants) key action of the Cherry
Browns. Whatever the reason, it is welcome, though it leaves a bit
of regret when using another keyboard.
I would like to try Blue switches for comparison, but as changing
out 70ish switches does not appeal to me, I will keep on keeping on
with the switches I am already using.
Speed
I don’t find that my typing speed is much affected (and I did not
expect to), now that I have broken my fingers in on the new layout.
Sustained typing that does not include a large proportion of numbers
or symbols (which I have never been very good at touch-typing)
hovers between 90 and 110 WPM, which is identical to my
results on the keyboard I’ve been using for two or more decades. I
do still occasionally get a burst of errors that requires me to sit
back and try again; I think this is due to the ortholinear layout,
and reversions to my traditional keyboard finger placement. This
has become quite rare in the past few days, however. As I said in
my first impressions review, I came up to about 80% of my sustained
typing speed in just a few days; after that, I crept up to 100% over
just a few more. The adjustment period was quite rapid and
painless.
Summary
I remain impressed. I believe I will enjoy using this keyboard for
a long time. I still plan to make some simple modifications (as in
my first impressions, to the LCD, support, etc.), but I do not
consider them urgent. It is perfectly usable as-is.
I got the non-full-hand case, CherryMX Brown switches, and black DCS
unmarked keycaps. In the meantime, I ordered ABS QWERTY double-shot keycaps
from Pimp My Keyboard that match
the blank keycaps. The PMKs are ABS while the blanks are (I
believe) PBT, and the ABS caps have a bit more lustre than the PBT,
but the profiles are identical and I am quite pleased with the
results.
This kit is expensive. All told, it cost me right about $300 for
the keyboard kit and the extra key caps. That's probably in the
ballpark of what it would cost to source one yourself, though (and
maybe a lot less, depending on your access to things like a laser
cutter), particularly since there are a lot of square inches of
circuit board involved — which is pretty expensive in small
quantities. For me, the price was worth a try, since I use a
keyboard constantly and I do most of my extended typing at a single
workstation. YMMV.
Usage
As far as initial experiences, I had to immediately remap the thumb
clusters and number keys because a) I use my left thumb for
space and always have (though that’s “wrong”)
and b) I’ve been using an ergonomic split keyboard with 6
on the left half for about 20 years. The default ErgoDox layout
puts space in the right thumb cluster and the 6 key on the right.
This necessitated some other changes, so I made those, and then
cleaned up some other things I thought I’d like better. I’ll get a
picture of my layout up once it settles.
The ortholinear key layout gives me a tiny bit of trouble on the b,
n, m, and y keys. I get a lot of extra ] characters (which I have
mapped to the left of y) and n/m often include the other. I hit the
key right of b along with the b key pretty often, but it’s a
function key that doesn’t cause an actual typo when it happens.
Also, it appears (and I had no idea) that I type cd wrong. I use my
left index finger for c and the middle finger for d, which is easy
and convenient on a staggered keyboard, but leads to vd on an
ortholinear. Who knew. This is of course only a major distraction
since I’m an inveterate Unix command-liner.
The Cherry browns are rather pleasing so far. They don’t feel
exactly like my old keyboard, but they are definitely familiar, and
they’re not super loud while providing good feedback. If anything,
I suspect they’re quieter than my old keyboard. They do have a
little bit of a ringing sound in the springs (particularly toward
the bottom of the keyboard, I assume due to the mechanicals of the
case) that I am not a huge fan of. It’s not a deal-breaker, though,
and putting rubber feet on the keyboard (I haven’t put feet on it,
yet) might help.
I’m not entirely pleased with the behavior of the LCD; in
particular, it glows all the time. It also changes colors when
function keys are pressed, but that is easily fixable by
configuration (more on that below). It also displays and Input Club
logo on both sides when in the base layer, and large block numerals
when on another layer. I’d much rather have status indicators
(e.g. shift, caps lock, ctrl, etc. and a smaller
layer stack. I may address this at some point.
The included laser-cut acrylic case is OK. It’s solid and
functional, but while I know it’s a popular design choice these
days, I’m not a huge fan of stacked acrylic enclosures. It did
allow Input Club to start shipping the keyboards without large
tooling costs, but they’ve shipped enough of them now that I imagine
injection molded ABS will start becoming a possibility — I
don’t know if it’s in the cards or not. Third party cases are
rather popular, maybe it’s not worthwhile.
Assembly
The Infinity ErgoDox comes as a kit, with the surface mount
components and LCD screens pre-installed to the PC boards on each
half, the laser-cut acrylic case and aluminum mounting plates,
stabilizers for the four 2U thumb keys, screws and posts to assemble
the case, key switches, and key caps. Some components are optional
or available in multiple configurations. Assembly consists of
installing the key switches to the mounting plate, soldering them to
the PC board, and then assembling the case and installing key caps.
All of these steps are reasonably straightforward, and good
instructions are provided for everything but the key caps. Assembly
took me about half an hour per half (give or take) and went down
with no hitches. Two extra key switches were provided, and though I
did bend a couple of pins getting switches into place, they were
easily straightened and I did not use the extras.
No documentation is provided for identifying and placing the various
non-1u keys, the intended orientation of key caps on the thumb
cluster, etc. By laying out the provided keys, I was able
to determine that the four vertically-oriented 1.5u caps are row 2
(as I recall; possibly row 3), the two 2u keys on each half have row
3 closest to the main keyboard and row 2 outside of that, and that I
prefer row 1 1u caps along the outside edge. I chose to install a
row 2 1u cap beside the row 2 2u cap. I’m not sure what the
provided key caps intend for those 1u caps, because I had enough
extras that I wasn’t going to count them. I had one row 3 1.5u left
over, but I imagine that was a mistake.
Modifications
As mentioned above, I have already tweaked my layout to some
degree. This is rather easy to do
using Input
Club’s online configurator, or indeed with the “Keyboard
Layout Language” (KLL) that the firmware ultimately uses to
describe the keyboard.
The keyboard uses a firmware
called kiibohd
and the KLL keyboard
description compiler to describe layouts. Compiling a new firmware
is very easy (at least on Linux), as the build scripts are
well-designed and complete. Furthermore, the complete open source
nature of both the keyboard description and the firmware means that
modifying the keyboard for personal use is very easy. As mentioned
above, I’d like to see some changes made to the LCD backlighting and
information display, and it’s very possible to make those changes
myself. The quality of the firmware code seems to be pretty fair
from what I have seen, although there are certainly some decisions
that I would not have made. (In many cases, to reduce latency or
ensure n-key rollover, both things that I have little
interest in but which are reasonable concerns for some people.)
A The case lays flat on the desk as it comes, which is how I used my
old keyboard, but as the halves of the Infinity ErgoDox are
separate, I would like to experiment with tenting it. I believe I
will start out by making some simple wedges of wood to put under it
and see what I think, then design something more stable and
practical from there. The provided case is secured with nine
standoffs and screws on each half, providing plenty of opportunity
for stable mounting.
Summary
So far, I’m impressed. Physical build quality and comfort is good.
My typing speed has suffered some, but not a lot (while I haven’t
done any testing, I think on day two I’m probably up to about 80% or
more of my typical speed — somewhere around 100 WPM
— except that when I start making mistakes I sometimes get
good and fouled up before I can get untangled). Learning to use the
thumb clusters was faster than I expected, and I already do
reasonably well with space and backspace (on the left cluster) and
enter (on the right cluster). I’m still getting used to modifiers,
and for that reason I have placed them in their usual places on the
left hand — which may be a crutch I come to regret. The C-]
keybinding I use for screen is rather convenient (using a control
key in the right thumb cluster and ] mapped to the vertical 1.5u key
left of y). Alt+backspace gives me some trouble, as the default
ergodox mapping of alt (the farthest key in each thumb cluster) is
quite hard to reach, and my crutch position leaves me pressing the
alt key with my middle or index finger and backspace with my thumb
— not impossible, but requiring some unfortunate contortions.
Subtle layout changes and experience will no doubt smooth some of
these things.